Fetch / Push Issues
Troubleshoot Git authentication issues and configure various push/fetch methods including SSH keys and credential helpers.
If you are having trouble pushing or fetching from a remote, this is likely related to git authentication. Here are a few configuration options you can try out, found in the project settings.
Configuring the auto-fetch frequency
GitButler will periodically fetch from your configured remotes in order to display new branches etc. By default, this happens every every 15 minutes.
You can configure the interval or completely disable this behavior by editing the application's settings.json file:
bash ~/Library/Application\ Support/gitbutler/settings.json The file is in JSONC format and follows the following schema
A negative value (e.g. -1) disables auto fetching. Note that if fetch is the only entry in the JSON file, you may want to enclose it in a top-level object.
Available authentication methods
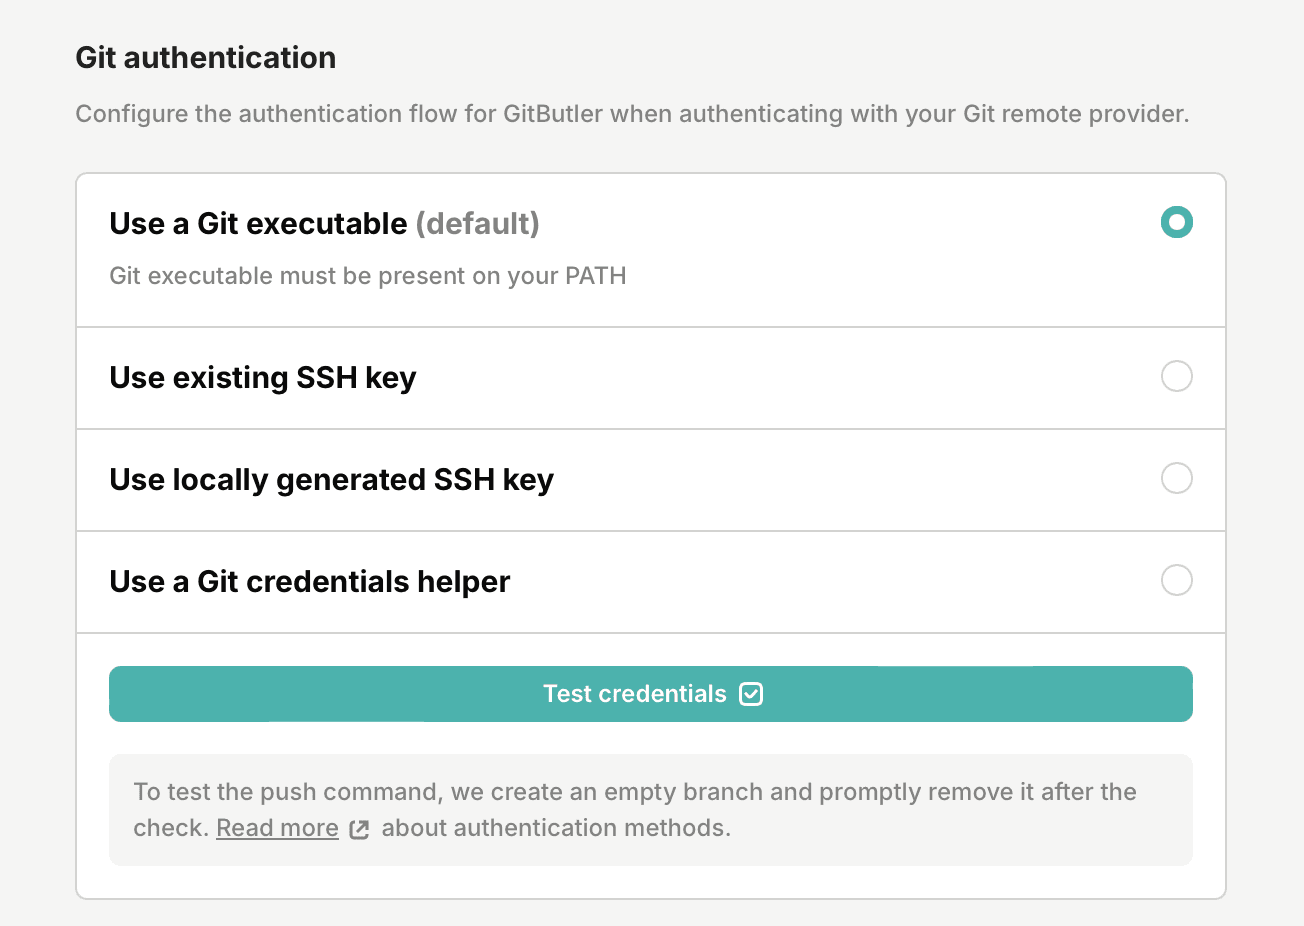
GitButler can be configured to use several different git authentication methods. You can switch between them in your project settings. You can try multiple different options and see if any of them are appropriate for your setup. Note that if you are on Windows, the only applicable method is the "Git executable", therefore the application will now show this as a configuration option.

Use a Git executable (default)
The default way to push and fetch is for GitButler to use an existing system Git executable. This should use whatever authentication mechanism that Git uses for the remote that you're trying to push to or fetch from.
Use an existing SSH key
If already have an SSH key set up (eg. ~/.ssh/id_rsa), you can instruct GitButler to use it. In case the key is password protected, you can also provide the password to it (which will be stored locally).
Use locally generated SSH key
This option generates a new SSH key which will be stored locally in the application data dir. For this to work you will need to add the new public key to your Git remote provider.
Use a git credential helper
If your system is set up with a credential helper, GitButler can use that. For more info on git credential helpers, see this article.
FIDO security keys (YubiKey, etc.)
If you're using a FIDO key, check out this issue to see how people have set it up with the Git executable method: #2661
Keys managed by 1Password
Keys stored in 1Password should properly use it as an SSH agent for authentication and signing commits if you use the Git executable option. (Previously tracked in #2779)
Host certificate checks
There is an option to ignore host certificate checks when authenticating with ssh. This may be a helpful option to enable in some cases.
Other known issues
Git remote servers with a non-standard SSH port
In some cases, the git remote may be setup on a port number other than 22. If the port is set in your ~/.ssh/config file, GitButler will not be able to recognize that - tracked in GitHub issue #2700.
As a workaround you may set your remote in the SSH format (eg. ssh://git@example.com:3022/foo/bar.git)
Updating virtual branches when the respective remote has new commits If you have added a remote branch to your active workspace in GitButler, or pushed a virtual branch to the remote, and new commits are added to the remote branch, there is currently no way to sync those new commits into the existing virtual branch in GitButler. This is being tracked in the GitHub issue #2649.
The current workaround is to undo any local commits and then stash your local changes manually using git stash and then delete the virtual branch that has upstream changes. Then you can update the trunk by clicking the update button next to the word "Trunk" in the sidebar on the left to make sure all new upstream changes are synced, then select the remote branch that has the new changes and click the "Apply +" button above the list of commits for the branch. Once the updated branch is applied to your working directory, you can manually git stash pop your stashed changes and then resolve any merge conflicts.
OAuth app access restrictions on your GitHub organization
If you're submitting code and PRs to a repository under an organization on GitHub, you may receive an error that, despite having correct authorization credentials, your organization has enabled OAuth app access restrictions. These restrictions are an organization-level security feature designed to prevent unauthorized third-party applications from accessing organization resources.
To solve this, go to Applications. Select the "Authorized OAuth Apps" tab, and look for "GitButler Client". If you don't find "GitButler Client", it's possible you haven't yet set GitButler up for personal use. If so, try creating a test commit on a test branch for a personal repository using GitButler, which you can delete after, then check the same tab as before.
If you see "GitButler Client", click on it and, under "Organization Access", across from the organization you wish to enable GitButler for, click either the "Request" or "Grant" button, depending on whether you are a contributor or owner, respectively. If you're a contributor clicking "Request", note that you'll need to wait for an organization owner to approve your access request before you can proceed.
Note for organization owners: To streamline this process for your team members, you can pre-approve GitButler for all organization members. This eliminates the need for individual access requests and approvals. This can be managed through your organization's OAuth app access settings.
Help on Discord
If none of the available options helps, feel free to hop on our Discord and we will be happy to help you out.
Last updated on